Wie funktioniert ChiPushing ?
Warum ChiPushing?
Bevor ich versuche, den Vorgang des "Chi-Pushens" zu beschreiben, möchte ich zuerst kurz darstellen, wie das Pushen normalerweise abläuft. Dadurch wird der Vorteil des ChiPushing anschließend am besten verdeutlicht.
Bei den meisten Skateboardern wird das nach folgendem einfachen Prinzip ablaufen:
Der hintere Fuß wird auf den Boden gesetzt, um sich damit kräftig vom Boden abzustoßen und das Skateboard oder Longboard vorwärts zu bewegen. Das vordere Bein
bleibt auf dem Board und hält es unter Kontrolle, wodurch mit dem Körpergewicht während der gesamten Zeit Druck nach unten ausgeübt wird. Wenn man das Board auf diese Weise über einen längeren
Zeitraum in Fahrt halten will, wird man früher oder später feststellen, dass die Muskeln ermüden und bei ungeübten Fahrern kann sich auch ein schmerzender Muskelkater bemerkbar machen. Das ist
die Folge der sich wiederholenden Beanspruchung durch das Abstoßen, sowie durch den Druck und die Spannung, die gleichzeitig im vorderen Bein auf dem Board beibehalten werden. Hinzu kommt, dass
durch das Gewicht des vorderen Beins, welches beim Pushen auf das Board drückt, die Reibung der Rollen auf dem Boden verstärkt wird, so dass beim Abstoßen immer auch Kraft benötigt wird, um das
Board gegen diesen Rollwiderstand zu beschleunigen. Außerdem gibt es auch viele Skateboarder, die beim Pushen nur die Fußballen in direkten Bodenkontakt bringen, was gerade beim kraftvollen
Abstoßen zusätzlich zu einer unnötigen Überbeanspruchung des Fußes führt; besonders dann, wenn man immer auf der selben Seite und mit dem selben Bein pusht.
Natürlich wird sich der Körper an die Beanspruchung beim Pushen anpassen und die verwendeten Muskeln werden durch das regelmäßige Training gestärkt. Dadurch wird es dann mit der Zeit ebenfalls möglich, längere Strecken ohne größere Probleme zu bewältigen. Bei der Verwendung reiner Muskelkraft wird der Körper jedoch trotz allem früher oder später an seine Grenzen stoßen. Außerdem kann man die einmal erreichte Kondition bei zu wenig Training auch schnell wieder verlieren. Der Körper wird sich nämlich immer an die bestehende Beanspruchung anpassen und deshalb wenig eingesetzte Muskeln auch wieder abbauen. Beim ChiPushing bleibt es jedoch möglich, die einmal verinnerlichte Methode unabhängig von der jeweils vorhandenen Kondition abzurufen und sich für Fahrten auf längeren Strecken erfolgreich zu Nutze zu machen. Es wird dadurch möglich, sich zusätzlich zum Einsatz der Muskelkraft eine zweite Grundlage für ausdauerndes Pushen auf langen Strecken zu erschließen.
Die im Folgenden beschriebene Methode des ChiPushing wird sich von außen betrachtet in ihrem wahrnehmbaren Bewegungs-ablauf nicht sofort erkennbar von der Form des normalen Pushens unterscheiden lassen. Im Grunde sind es auch nur geringe äußerliche Veränderungen, die jedoch Einfluß auf die Effektivität der ausgeführten Bewegung haben.
Die richtige Körperhaltung
Bevor ich den Ablauf des ChiPushens konkret erläutere, möchte ich zuerst noch auf die richtige Körperhaltung hinweisen:
Während der gesamten Bewegung des Pushens sollte der Rumpf idealerweise der einzige Bereich des Körpers sein, dessen Muskeln tatsächlich beständig beansprucht
werden. Dagegen bleiben die Muskeln der Arme und Beine möglichst entspannt und alle Gelenke locker. Die Wirbelsäule wird immer gerade gehalten. Wichtig ist es dabei, den Kopf im Bereich des Kinns
leicht nach hinten zu schieben, was den Nackenbereich begradigt. Ziel ist es, dadurch den gesamten Rumpf aufzurichten. Die Schultern bleiben dabei locker hängen. Das Becken wird leicht nach vorne
gekippt, um die Krümmung der Wirbelsäule im unteren Rückenbereich zu verringern. Die Arme werden an den Ellbogen leicht angewinkelt und schwingen während der Pushbewegung der Beine unterstützend
mit; so wie das auch während des Joggens geschehen würde.
Diese Haltung ist ein wichtiger Aspekt für das Erreichen des bestmöglichen Ergebnisses beim Chi-Pushen, da sie unterstützend auf den Körperkreislauf wirkt und es der Energie ermöglicht ungehindert durch den Körper zu fließen. Der aufgerichtete Oberkörper ermöglicht es uns auch die Rumpfmuskulatur besser zu nutzen, mit deren Hilfe die Beine entlastet werden können.
Die Technik des ChiPushens
Um mit dem ChiPushing zu beginnen, sollte der vordere Fuß sich im Bereich der vorderen Boardhälfte befinden und gerade oder leicht schräg nach vorne zeigen. Der Oberkörper ist ebenfalls nach vorne gerichtet, so dass wir gerade nach vorne schauen. Zu Beginn ist der Körperschwerpunkt gleichmäßig auf beide Beine verteilt. Wir gehen leicht in die Knie, wobei wir diese bewußt lockern. Nun beginnen wir die Bewegung, indem wir den Schwerpunkt des aufrecht gehaltenen Oberkörpers ganz leicht nach vorne fallen lassen. Die Fallbewegung wird dabei mit dem ganzen aufrecht auf dem Board stehenden Körper ausgeführt und nicht indem nur der Oberkörper in der Hüfte nach vorne gebeugt wird. Die auf diese Weise eingeleitete Forwärtsbewegung des Körpers fangen wir anschließend auf, indem wir den hinten auf dem Board stehenden Fuß vom Deck nehmen und ihn seitlich am vorderen Bein vorbei nach vorne führen und auf dem Boden absetzen. Schon diese Bewegung hat, wenn sie richtig ausgeführt wird, einige Ähnlichkeit mit der nach vorne kommenden Beinbewegung beim schnellen Laufen oder Joggen. Das Bein unterhalb des Knies ist dabei nach hinten abgewinkelt und das Knie wird als erstes in der Vorwärtsbewegung nach vorne geführt bis dann das untere Bein mit dem Fuß nachfolgt und idealer Weise auf Höhe der vorderen Rollen oder leicht davor, auf dem Boden aufsetzt. Hier zeigt sich schon ein erster Unterschied zum oft üblichen Ablauf beim Pushen, bei dem das Pushbein häufig hinter dem vorderen Standbein in einer nach hinten kickenden Bewegung den Boden berührt.
Während der Bewegung des hinteren Beins ruht das gesamte Körpergewicht auf dem vorderen, auf dem Board stehenden Fuß. Der nach vorne gebrachte Fuß berührt mit der äußeren Mittelsohle und den Ballen zuerst den Boden. Erst danach folgt die Ferse, so dass der Fuß zum Schluss flach auf dem Boden aufsetzt. Dabei sollte der Fuß nicht vor dem Körper ausgestreckt, sondern unterhalb des Körperschwerpunkts den Boden berühren. Nach dem Aufsetzen wird das gesamte Körpergewicht auf dieses Bein verlagert. Dabei sollte die gesamte Fußsole den Boden berühren, was mehr Sicherheit sorgt. Der Fuß und das Bein auf dem Board sind nun vollständig entlastet. Nur die Sohle bleibt noch mit dem Deck in Berührung und bewegt das Board nach vorne. Entscheidend dabei ist aber, daß wir das Board nicht wie beim normalen Pushen nach vorne schieben, sondern es vielmehr mit der Schuhsole am Griptape nach vorne ziehen ohne Druck auszuüben. Mit dieser Methode kann man ein Longboard oder Skateboard auf sehr effektive Weise beschleunigen. Die Reibung zwischen den Rollen und dem Boden ist in diesem Moment am geringsten.
Erst nachdem wir das Board ein Stück nach vorne bewegt haben, verlagern wir das Körpergewicht wieder auf das inzwischen mit dem Board nach vorne bewegte Bein. Der Fuß auf dem Boden wird gleichzeitig beginnend mit der Ferse in einer Abrollbewegung zu den Fußballen hin vom Boden gelöst. Hierbei kommt es auch darauf an, die Gewichtsverlagerung zurück auf das Deck im richtigen Zeitpunkt durchzuführen, da bei einem zu späten Wechsel das zum Rollen gebrachte Board sonst wieder abgebremst werden könnte.
Beim Anheben des Fußes sollte darauf geachtet werden, sich möglichst nicht vom Boden abzudrücken, wie man das vom normalen Pushen gewohnt ist. Genau genommen ist das auch gar nicht mehr nötig, da das Board bereits durch das Nach-Vorne-Ziehen beschleunigt wurde und man sich die Kraft, die man für das Abdrücken mit dem Pushbein benötigt, einsparen kann. Am Anfang wird einem das sicher nicht immer gelingen. Jedoch kann man sich zum Ziel setzen, beim Lösen des Fußes mit der Zeit immer weniger Druck auszuüben.
In manchen Situationen, z.B. wenn man beim Anfahren etwas schneller beschleunigen möchte, kann weiterhin auch ein Rückstoß mit dem "Pushbein" gegen den Boden sinnvoll sein. Wie alle Bewegungen beim ChiPushing sollte das jedoch in einer nach außen hin sanften, gleichmäßigen und leichten Bewegung ablaufen. Ein zu hektisches Abstoßen oder stampfen mit dem Fuß würde dem Wesen dieser Methode entgegen wirken, die eine sanfte aber gleichzeitig effektive Kraft beim Pushen entwickeln und fördern soll.
Anschließend kann man, wie bereits beschrieben, das Bein erneut mit dem Knie voran in einer kreisförmigen Bewegung nach vorne führen und wieder im Bereich der vorderen Rollen auf den Boden setzen und mit dem Bein auf dem Board Schwung für die weitere Beschleunigung holen. Ein weiterer wichtiger Punkt bei dieser Pushbewegung der Beine ist der Einsatz der Hüfte. Die Bewegung der Beine sollte in der Hüfte beginnen und von dort geführt werden. Das ermöglicht eine Verlängerung der Beine während des Push-Vorgangs, wodurch unnötige Bewegungsarbeit durch zu viele kleine Kicks vermieden wird.smile emoticon
Die Wichtigkeit des Switch-Pushens
Um eventuellen einseitigen Belastungen vorzubeugen, sollte man jedoch nach dem Ausführen mehrerer Push-Wiederholungen die Seite und das Bein wechseln. Das kann durch einen kurzen flachen Sprung eingeleitet werden, mit dem man die Stellung des Vorder- und Hinterfußes austauscht. Eine einfache Möglichkeit besteht auch darin, kurz den vorderen Fuß vom Board zu nehmen und gleich im Anschluß mit dem hinteren Fuß in den vorderen Bereich des rollenden Boards zu wechseln. Hierbei kann man dem Board mit dem neu platzierten Fuß sogar noch einmal einen Impuls nach vorne geben und es dadurch beschleunigen. Ich nenne das den "ChiPushing Footplant" oder auch "ChiPushing Footslide". Wenn man ein längeres Board hat, ist auch ein langsamerer Wechsel möglich, ohne den Boden zu berühren. Hierbei werden die Fußpositionen schrittweise umgestellt, indem man den vorderen Fuß nach hinten führt und direkt vor dem hinteren Fuß absetzt. Anschließend kann dann der hintere Fuß im vorderen Bereich des Boards platziert werden.
Durch den Seitenwechsel wird es möglich, das unvorteilhafte Mongo-Pushen, bei dem man den vorderen Fuß zum Pushen vom Board nehmen und anschließend wieder auf das Board zurückdrehen müsste, zu umgehen. Wer sich nicht daran stört, kann die Prinzipien des ChiPushing grundsätzlich aber auch beim Mongo-Pushen anwenden.
Schrittweises Umsetzen
Am Anfang mögen es vielleicht zu viele Punkte auf einmal sein, wenn man gleichzeitig zur veränderten Art des Pushens auch noch seine Aufmerksamkeit auf die Haltung des Oberkörpers richten soll. In diesem Fall, empfehle ich schrittweise vorzugehen und entweder erst einmal die Haltung des Oberkörpers beim gewohnten Pushen einzuüben oder sich zunächst nur mit dem Bewegungsablauf der Beine zu beschäftigen. Wenn man ein Gefühl für die verschiedenen Bestandteile des ChiPushing entwickelt hat, kann man dann alles zu einem Ganzen zusammenfügen.
Zusammenfassung / Summary
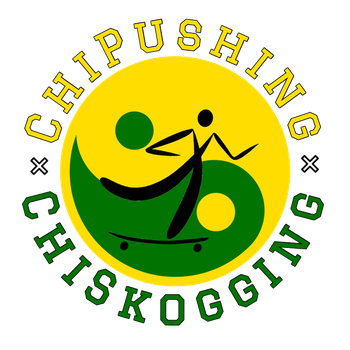
Ausgangsstellung:
Anschließend wenden wir den Oberkörper nach vorne, wobei auch der vordere Fuß mit den Zehen nach vorne gedreht wird. Die zuvor eingenommene Haltung sollte dabei beibehalten werden. Der Körperschwerpunkt ist noch gleichmäßig auf beide Beine verteilt.
Next we turn the upper body facing forward. At the same time we turn the toes of the front foot to point forward, too. The position of the upper body mentioned before should be maintained.
The center of gravity is still distributed evenly on both legs.

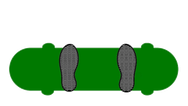
Wir beginnen die eigentliche Bewegung, indem wir den Körperschwerpunkt nach vorne auf das vordere Bein verlagern und den gesamten Körper der Schwerkraft folgend leicht nach vorne fallen lassen.
We start the actual movement by shifting the center of gravity forward on the front leg while letting the whole body slightly fall forward; following the force of gravity.

Als nächstes führen wir das hintere Bein nach vorne und fangen die Vorwärtsbewegung des Körpers auf, indem wir den Fuß mit der gesamten Fläche knapp vor den vorderen Rollen auf den Boden setzen. Das gesamte Körpergewicht wechselt dabei auf den rechten vorderen Fuß.
Next, we bring our rear leg to the front to catch the forward movement of the body by putting our foot with it`s entire footing area to the ground just before the front wheels. Meanwhile the
entire body weight changes to the right front foot.

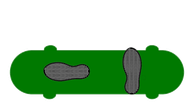
Anschließend beschleunigen wir das Board, indem wir es mit dem linken entlasteten Bein in einer Zugbewegung von hinten nach vorne rollen, ohne Druck auf das Board auszuüben. Die Bewegung hat dabei ihren Ursprung in einer leichten Rotation des Oberkörpers, die sich bis in die Beine fortsetzt. Das Pushbein dient nur als Unterstützung für die Vorwärtsbewegung, ohne dabei den Körper nach vorne abzustoßen.
After that we accelerate the board by rolling it with the left relieved leg in a pulling motion from back to front without applying pressure down on the board. This movement has its origin in a slight rotation of the upper body, which continues down to the legs. The Push leg only serves as a support for the forward movement without repelling the body off the ground.
Danach verlagern wir das Gewicht wieder vom rechten Pushbein auf das linke Bein auf dem Board. Dabei versuchen wir, den rechten Fuß bewußt vom Boden anzuheben, ohne uns dabei abzustoßen. Um das richtige Gefühl dafür zu bekommen, kann es hilfreich sein, sich vorzustellen, dass man den Fuß über ein Hindernis hinweghebt.
Wir können jetzt den rechten Fuß in einer kreisförmigen Bewegung wieder nach vorne bringen und wie oben beschrieben weiter pushen oder auch im hinteren Bereich des Boards absetzen. Nachdem beide Füße wieder auf dem Board stehen, können wir auch einen Seitenwechsel für das weitere Pushen durchführen.
Finally, we shift the weight back from the right foot to the left leg on the board. While doing this we try to consciously raise the right foot off the floor without pressing down on the ground. To get the right feeling for this it may be helpful to imagine lifting the foot over an obstacle.
Now we can move the right foot forward again in a circular motion and keep pushing on as described above or settle the foot in the rear area of the board. After both feet are back on the board we can also perform a switch of the foot stance to push on the other side.

Richtiges switch pushen (d.h. nicht Mongo-Style):

Danach können wir sofort wieder weiter pushen; diesmal mit dem linken Bein.
How does ChiPushing work ?
Why ChiPushing?
Before I try to describe the process of ChiPushing, I would first like to briefly explain how normal pushing is done. This will later help to better understand the advantages of ChiPushing.
Most skateboarders will apply the following simple principle:
The rear foot is placed on the ground to vigorously repel off the ground and to move the skateboard or longboard forward. The front leg remains on the board and
keeps it under control by exerting downward pressure with one´s body weight. If you want to keep the board rolling in this way over a longer period, you will sooner or later notice that the
muscles get tired and inexperienced skaters will also feel their muscles aching. This is the result of stress due to the repetitive pushing as well as the pressure and the tension which are
maintained in the front leg while standing on the board. Furthermore, through the weight of the front leg, which presses on top of the board while pushing, the friction of the wheels on the
ground will be intensified, so that always additional push-off force is needed to accelerate the board against this rolling resistance. In addition many riders will only put the footpad of their
front foot into direct contact with the ground, which further leads to an unnecessary overuse of the foot; especially if one always pushes on the same side and with the same leg.
Of course, the body will adapt to the stress during pushing and the muscles used will be strengthened through regular training. In this way it will be possible to cope with longer distances without having major problems as well. However, when using pure muscle power the body will nevertheless sooner or later reach its limits. Besides, you can lose your once attained condition quickly if you are not training enough. Your body will always adapt to the existing stress and therefore also reduce muscles which are not used often. However, with Chi Pushing it remains possible to retrieve the once internalized method regardless of the respective condition of the body and to successfully put it into use for riding on longer distances. In addition to the use of physical strength, it then becomes possible to have another foundation for persistent pushing.
Considering the externally perceptible movement the method of Chi Pushing described below will not differ much from the motion usually done while pushing. This is because externally there are only small changes, which nevertheless have an impact on the effectiveness of the executed movement.
The correct body posture
Before I get to explain the motion of pushing in detail, I would first like to point out the correct posture:
Throughout the whole movement the upper body should be the only part of the body with engaged muscles. On the other hand the muscles of the arms and legs should be
relaxed as much as possible and all joints should be loose. The spine is always kept straight. It is also important to move the head slightly to the back in the area of the chin which straightens
the neck area. The goal of doing this is to straighten the whole upper body. At the same time the shoulders stay loose. The pelvis is tilted slightly forward to reduce the curve of the spine in
the lower back area. Finally the arms will be slightly angled and support the pushing motion of the legs by swinging.
This body posture is an important aspect for achieving the best possible result from ChiPushing. It supports the body circulation and allows the energy to flow through the body without restriction. The straightened upper body will let us use our trunk or core muscles to the best and with their help it is possible to relieve the legs.
The technique of ChiPushing
To begin with ChiPushing the front foot should be located in the area of the front half of the board and should show straight forward or be slightly inclined. The upper body is directed forward as well so that we are looking to the front. At the beginning the center of gravity is evenly distributed on both legs. We first bend the knees slightly and consciously loosen them. Now we start the motion by letting the weight of the upper body fall slightly forward. This falling motion has to be performed with the whole body standing upright on the board and not by only bending the upper body in the area of the pelvis. The forward motion of the body initiated in this way will then be stopped by taking the back foot from the deck, leading it forward passing the side of the front leg and putting it on the ground. This movement has, if executed properly, a lot of resemblance to the forward-movement of the leg during fast walking or running. The leg below the knee is bent backwards and the knee will be the first in the forward movement until the lower leg with the foot follows and touches the ground; ideally at the level of the front wheels or slightly in front of it. This is already a first difference to the usually performed kind of pushing where the pushing foot is mostly touching the ground behind the front standing foot in a kicking way.
During this movement of the rear leg the entire body weight rests on the front foot, placed on the board. The foot, which has been led to the front will be placed flat on the ground with the outer midsole and footpads first and finally followed by the heel. By doing this the foot should not be stretched out in front of the body but rather touch the ground beneath the body weight. After touching the ground the entire body weight switches to this leg. By doing this all of the foot`s sole should touch the ground, resulting in more safety. The foot and leg on the board are now completely relieved. Only the sole of the foot remains in contact with the surface of the deck and moves the board forward. The decisive factor, however, is that we do not push the board as in the usual way of pushing forward, but rather pull the grip tape forward with our shoe soles without exerting any pressure. Using this method, you can speed up a longboard or skateboard in a very effective manner. At this moment the friction between the wheels and the ground is very low.
Only after we have moved the board forward a little bit, we move back the body weight onto the leg standing on the board, which is now in front again. At the same time we resolve the foot on the ground in a rolling motion starting from the heel to the footpad. This weight shift back on the deck should be performed at the right time, as a late change might otherwise slow down the rolling board again.
When raising the foot one should be careful not to repel from the ground as one is used to from common pushing. Strictly speaking, it is no longer necessary since the board has already been accelerated by pulling it forward and one can save the power one would need when pushing intensely. Of course in the beginning it will not always be possible to succeed with this method. However, one should practice using less and less pressure when releasing the foot from the ground.
In some situations, e.g. if you want to speed up a little faster when starting up, a recoil with the pushing leg against the ground can be useful as well. However, like all movements during ChiPushing this should, perceived from the outside, be done in a gentle way by a smooth and easy movement. Pushing off too hectic or stomping hard with your foot would go against the essence of this method which is to develop and promote a gentle but effective force when pushing.
Subsequently, one can lead the leg forward again in a circular motion starting with the knee first and begin the next round of pushing. Another important point in this push movement of the legs is the use of the hips. The movement of the legs should start at the hip and continue from there. This enables the legs to be lengthened during the pushing process, which avoids unnecessary movement activity caused by too many small kicks.
smile emoticon
The importance of switch-pushing
To avoid any one-sided burdens on the leg, one should switch sides and legs after having done several push reps. This can be initiated by a short flat jump to exchange the position of the front and rear foot. Another very simple way is to briefly take the front foot from the board while moving the back foot in the front area of the rolling board. In this way you can even give the board a boost forward with the newly placed foot and add to the speed. I call this the "ChiPushing Footplant" or "ChiPushing Footslide". If you have a large board it is also possible to perform a slower change without touching the ground, which is done by the gradual change of foot positions: One places the front foot to the back just before the back foot. The rear foot can then be placed in the front area of the board.
By switching sides it becomes possible to avoid the unfavorable mongo pushing, in which one would have to take the front foot of the board for pushing and afterwards having to turn it back onto the board again. However, those who do not bother may apply the principles of ChiPushing even when pushing mongo style.
In the beginning it might be too many points at once if you try to change the way of pushing while additionally paying attention to the posture of the upper body. In this case I recommend a gradual approach by either practicing the posture of the upper body when pushing in your usual way or at first only dealing with the movement of the legs. When you have become used to the different parts of ChiPushing you can then combine everything together as a whole.
Progressing gradually
At the beginning it may be too many points at once if you are asked to focus your attention on the posture of the upper body while at the same time dealing with the altered type of pushing. In this case, I recommend proceeding step by step and either first practice the posture of the upper body while pushing as usual or initially only dealing with the movement of the legs. If you have developed a feeling for the different components of ChiPushing, you can then put everything together into a whole.